
Self-hosted remote desktop with one Docker Compose file
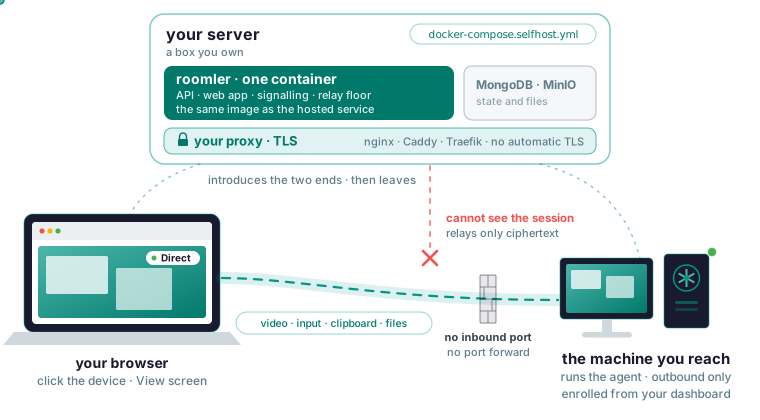
One Docker Compose file runs the whole Roomler server on a box you own, from the same image that runs the hosted service, with nothing held back. Self-hosting has no device limit imposed by Roomler. There is no automatic TLS, so you terminate it in the nginx, Caddy or Traefik you already run. The machines you reach connect outbound to your server and to peers, so they need no inbound port and no port forward. And your server cannot see a remote session: video and input travel between browser and agent, or through a relay that forwards ciphertext. On a clean machine the documented path answered in 32 seconds over a data-centre connection.
What one compose file gives you
The file brings up one container holding the API, the web app, the signalling plane, the chat and conferencing server and the relay floor, plus MongoDB and MinIO for state and files. You need Docker with Compose v2, about 4 GB of RAM and 10 GB of disk. It is one API instance: multi-node scale-out exists in the code as a Kubernetes topology, so this file will not grow into a cluster.
If you came from MeshCentral, one difference in shape matters. MeshCentral relays every session through the server by design, while Roomler’s server introduces the two ends and then leaves the session, falling back to a relay that forwards ciphertext only when no direct path exists. That is a bandwidth difference at fleet scale and a trust difference at any scale. Roomler vs MeshCentral also lists where MeshCentral wins: it runs on hardware where Roomler’s stack would not, it is Apache-2.0 throughout, it has a full RMM surface with inventory and power control, and it relays RDP, VNC and SSH to devices that will never run an agent.
Clone the repository and generate real secrets
Three commands get you a working tree and an environment file to fill in:
git clone https://github.com/gjovanov/roomler-ai.git
cd roomler-ai
cp.env.selfhost.example.env.selfhost
Fill in the required values in .env.selfhost; four of them are secrets, and each line below is labelled with the variable it feeds:
openssl rand -hex 32   # ROOMLER_JWT_SECRET
openssl rand -hex 32   # ROOMLER_TURN_SECRET
openssl rand -hex 24   # MONGO_ROOT_PASSWORD
openssl rand -hex 24   # MINIO_ROOT_PASSWORD
Keep the two datastore passwords alphanumeric, which hex output already is: the MongoDB password is interpolated into a connection URL, so an @, :, /, ? or # inside it breaks the URL, and the failure looks exactly like a wrong password. The token-signing secret cannot stay at its placeholder either: the server refuses to start in production mode on the built-in default, so a default cannot reach production quietly. Keep .env.selfhost out of version control and readable only by the account that runs the stack. If the token secret is ever exposed, rotate it; every existing session becomes invalid, which is the point.
Pull before up, or Compose builds from source
Run these two, in this order:
docker compose -f docker-compose.selfhost.yml --env-file.env.selfhost pull
docker compose -f docker-compose.selfhost.yml --env-file.env.selfhost up -d
Compose treats a service with a build: section as buildable, so if you skip the pull the missing image is compiled from source instead of downloaded, with no warning, which is the compile the published image exists to save. On a clean 4-vCPU VM with a data-centre connection, pull took 10 seconds, up -d took 21, and /health answered 32 seconds after the first command (measured 2026-10-12). An earlier run over a home connection took 88 seconds in all, since the pull is the part a slower connection stretches. Building instead takes roughly six minutes on a 16-core machine.
Images are published to GitHub’s container registry for linux/amd64 and linux/arm64 and are anonymously pullable, and every other image in the file is published for both as well. The arm64 Roomler image is built and smoke-tested on a native arm64 machine, but nobody has run the whole stack on an arm64 host yet. Watch it come up:
docker compose -f docker-compose.selfhost.yml --env-file.env.selfhost logs -f roomlerPut it behind the proxy you already run
There is no automatic TLS, on purpose: terminate it in nginx, Caddy, Traefik or a cloud load balancer, point the proxy at the container’s HTTP port, and set your public origin in the environment so sign-in returns, invite links and the CORS policy all agree about who you are. The origin includes the port. http://127.0.0.1 and http://127.0.0.1:8080 are different origins, and a mismatch produces a refused websocket upgrade and an application in which everything realtime silently does nothing, so a dashboard where sign-in works but presence, chat and the device list never update is pointing at this setting. By default only the application’s own origin is allowed, and widening that is a deliberate act.
Serve it over HTTPS in anything that is not a laptop talking to itself: the session cookie is accepted as authentication, so it must never travel in cleartext. The hardening page has the exposure table: the HTTP port sits behind your TLS terminator and the conference media range must be reachable from participants, while the database and the object store’s admin port are for the application only and stay on an internal network. Server settings are environment variables prefixed ROOMLER__. Email, OAuth sign-in (Google, GitHub, Microsoft, LinkedIn, Facebook), web push and Stripe billing are off by default, each a block of environment variables.
Enroll the first machine against your own server
Your server serves its own installers, and the script it hands out names your origin, so a machine enrolled from your dashboard enrolls against your instance. Mint a token in that dashboard: open Devices and click Enroll device. A token can be used once, is valid for about ten minutes and is scoped to one organization, and anyone holding a live one can join a machine to that organization, so keep it out of chat rooms and paste it straight into a terminal. For a headless Linux box, Install on Linux prints this line with the hosted address in both places:
curl -fsSL https://roomler.ai/api/setup/install.sh | sh -s -- \
  --role daemon --system --token <token> --server https://roomler.ai --name "$(hostname)"
Your own dashboard produces the same line with your hostname substituted, and --server <url> is what points the agent at a self-hosted server. A command copied from elsewhere may still name roomler.ai, and the machine then installs cleanly and never appears in your device list. Ask the machine which server it belongs to:
roomler status # which server does it think it belongs to?If the server it names is the wrong one, run the command your own dashboard hands out instead. From the machine, confirm it can reach your server:
curl -sI https://roomler.ai/health # or your own serverBack in Devices the machine shows Online when the server holds a live socket to it, Stale when it is heartbeating without one, which self-heals in about two minutes, and Offline when there is no heartbeat. If it never appears, the token was probably consumed by an earlier attempt, so mint a fresh one. The agent needs outbound TCP 443 to your server and outbound UDP to peers, and it opens nothing inbound. Installers and updates come through your server’s origin as well, so a corporate allow-list needs only that one hostname.
Open the screen and read the connection indicator
Click the device, then View screen. By default the machine asks the person sitting at it before handing over the screen, and unattended access is a per-device setting for machines that are yours. Four things happen: the server checks you are allowed and introduces the two ends, the machine asks its human unless it is unattended, the ends negotiate the fastest path that works (local network, then direct internet, then hole-punching, then a relay), and video, input, clipboard and files flow over that path with the server out of the way.
The indicator in the session window reads LAN, Direct or Relay. The CLI lists every peer with the path currently carrying it:
roomler peersIf two machines on the same network sit on Relay, the most common cause by a wide margin is a VPN client on one end capturing the local range; disconnect it and watch the pair converge to direct.
What the server sees is the inventory: your server holds accounts, device rows, permissions, audit records, chat messages and uploaded files. It holds no session video, keystrokes, tunnel contents, SSH bytes or mesh traffic. Once two machines can find each other the server is off the path, so there is nothing for it to log even in principle. When no direct path exists the pair falls back to a relay, and the floor relay runs over TLS on the server itself, forwarding ciphertext it cannot decrypt. That floor is why a separate TURN server is optional and off the critical path. Self-hosting collapses the distinction anyway: what the server sees becomes what your own machine sees.
Video calls are the one thing the proxy cannot carry
Remote desktop, tunnels, SSH and the mesh are peer to peer with a relay fallback. Conference video is different: browsers send media straight at an address the server advertises, on a UDP port range, with no reverse proxy involved. Two settings decide it: the announced IP, where 127.0.0.1 works only for calls made on the host itself, and the RTC port range, where 32 ports are mapped by default, enough to try it, while a real deployment wants the full range. On Linux give the roomler service network_mode: host and drop its ports: block, which is how the hosted service runs; Docker Desktop for macOS and Windows cannot do that, which is why the port-mapped form is the default.
A successful transport connect proves only that the browser sent its parameters. So when everyone joins, the interface looks right and nobody sees video, Calls have no video has you check the announced address first:
docker compose -f docker-compose.selfhost.yml --env-file.env.selfhost \
  logs roomler | grep -i announced
A loopback or container-internal address is your answer. On a fresh deployment where no call has ever worked, check the relay URL before the port range: a blank one advertises an ICE server with an empty URL, which browsers reject outright, so nobody can join. This is also the one feature where the server handles media, because a selective forwarding unit receives each participant’s stream and forwards it to the others.
Upgrade, back up, and check four things afterwards
Upgrading is the same two commands, pull then up -d:
docker compose -f docker-compose.selfhost.yml --env-file.env.selfhost pull
docker compose -f docker-compose.selfhost.yml --env-file.env.selfhost up -d
State lives in the MongoDB and MinIO volumes, so those are what you back up; the container is rebuilt from an image. Test a restore before you need one: bring the backup up in a throwaway stack and confirm the application starts and your files are there. Subscribe to releases so you hear about security fixes. After every upgrade, check four things: the health endpoint returns success, a device still shows online, a remote session still connects, and a call still carries video, which is the most fragile of the four and the one most likely to be affected by a network change.
Self-hosting does not change the access model: users, roles and permissions, network ACLs and device policies work identically, so configure them instead of leaving everything open because it is only you.
What this stack does not do yet
The compose stack is single node, and multi-node scale-out is supported by the code only as a Kubernetes topology. There is no automatic TLS. Every image has an arm64 build, but nobody has brought the whole stack up on an arm64 host yet. The separate relay is optional, because the built-in floor over the API’s own port already guarantees connectivity when no direct path exists.
There is no mobile viewer. RustDesk ships native iOS and Android clients, has a far larger install base, and its viewer and codec paths have been tested by more people on more hardware. TeamViewer and AnyDesk cover every platform and have the attended-support flow where a stranger reads you an ID over the phone; Roomler cannot do that today, because both machines must be in the same organization.
The server is AGPL-3.0 and the agent is MPL-2.0; running it for yourself, your family or your company is what the licence is for, and LICENSING.md covers the split and what it means if you intend to offer it as a service.
Run the whole stack yourself with Docker Compose, starting from the self-hosting guide.