Roomler documentation
Remote desktop in a browser tab, a private WireGuard-style mesh network, and team chat and video — one agent, on Windows, macOS and Linux.
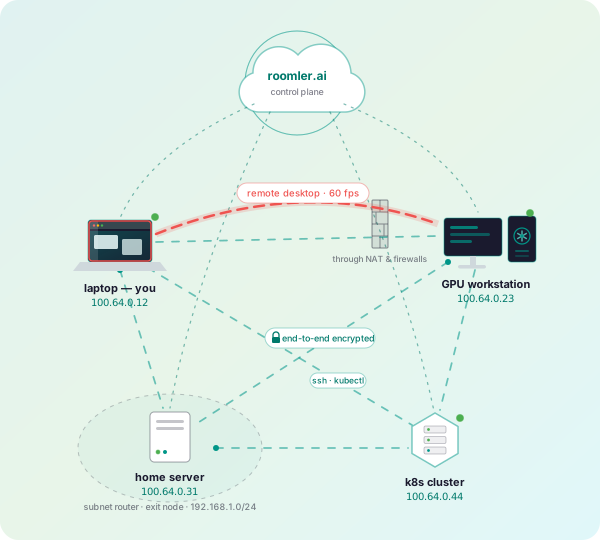
Roomler is three products on one small daemon. You install one agent per machine; everything else happens in a browser tab.
Traffic between your machines is end-to-end encrypted and goes peer-to-peer whenever a path exists. The server coordinates; it never carries your pixels, your keystrokes or your files.
Which path are you on?
| You want to | Start here |
|---|---|
| Reach one of your own machines from anywhere | Quickstart |
| Install on a specific operating system | Windows · macOS · Linux |
| Understand what Roomler actually is before installing | What is Roomler? |
| Run the whole thing on your own server | Self-hosting |
| Give a machine a private address other machines can reach | Private network |
| Know what the server can and cannot see | Security model |
| Fix something that is not working | Troubleshooting |
The three pillars
Remote desktop
— Hardware-encoded H.264, HEVC, AV1 and VP9 straight into a browser tab. No viewer to install, consent-gated, and it works from behind corporate firewalls.
Private network
— A WireGuard-style overlay mesh. Every device gets a stable private address and a name, and traffic goes directly between machines wherever it can.
Tunnels and SSH
— Forward a port, run a SOCKS5 proxy into a network only one machine can see, or SSH to a node with no sshd and no open port.
Exit nodes
— Route all of a device’s internet traffic through a machine you trust, with split-default routing that will not lock you out of your own box.
Chat, files and video
— Rooms with threaded messaging, reactions, mentions and attachments, plus an HD conferencing SFU with screen sharing.
Self-hostable
— One compose file, one published image. Everything above runs on infrastructure you own, with no feature held back.
Install in one line
Mint an enrollment token in your workspace under Devices → Enroll device, then run the line for your operating system:
Recommended — one-line install (PowerShell)
& ([scriptblock]::Create((irm https://roomler.ai/api/setup/install.ps1))) -Role daemon-system -Token <token> -Server https://roomler.aiGraphical installer (Roomler Setup)
Already installed? Enroll manually
roomlerd enroll --server https://roomler.ai --token <token> --name "$env:COMPUTERNAME" --machine-globalMachine-wide install — run the commands below from an Administrator PowerShell (Terminal (Admin)).
Recommended — one-line install
curl -fsSL https://roomler.ai/api/setup/install.sh | sh -s -- --role daemon --token <token> --server https://roomler.ai --name "$(hostname)"Graphical installer (Roomler Setup)
Already installed? Enroll manually
/Library/Roomler/roomlerd.app/Contents/MacOS/roomlerd enroll --server https://roomler.ai --token <token> --name "$(hostname)"Installs the per-user half (screen sharing + input). To also join the overlay mesh, mint a second enrollment token and append --daemon-token <token> — that adds a root LaunchDaemon and a second device row for this Mac.
Recommended — one-line install
curl -fsSL https://roomler.ai/api/setup/install.sh | sh -s -- --role daemon --system --token <token> --server https://roomler.ai --name "$(hostname)"Graphical installer (Roomler Setup)
Already installed? Enroll manually
sudo roomlerd --config /etc/roomler/config.toml enroll --server https://roomler.ai --token <token> --name "$(hostname)"Installs a root systemd system service (sudo will prompt). Screen capture needs a logged-in session — pick 'This user only' for desktops.
New to Roomler?
Quickstart walks the whole path — create a workspace, enroll a machine, open its screen — in about five minutes.
How the documentation is organised
Get started
— Per-OS installation, enrollment, and your first remote session.
Remote desktop
— Sessions, unattended access, consent, codecs and per-OS permissions.
Private network
— Addresses, MagicDNS, NAT traversal, subnet routers, exit nodes, tunnels and SSH.
Chat & video
— Rooms, calls, files and notifications.
Architecture
— The control plane, the three data planes, and what the server actually handles.
Security & access control
— The security model, roles and permissions, ACLs, device policies and audit.
Troubleshooting
— Offline devices, blocked connections, black screens and calls with no media.
Reference
— CLI, configuration keys, ports and the HTTP API.