Quickstart
Create a workspace, enroll your first machine with a one-line installer, and open its screen in a browser tab — in about five minutes.
- getting-started
- install
- enrollment
- quickstart
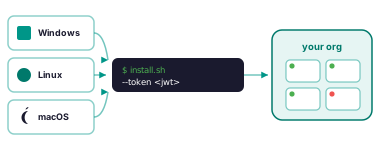
This is the whole loop end to end. It assumes nothing except a machine you can run a command on.
1 · Create a workspace
Sign up at roomler.ai and give the organization a name your team will recognise — it labels every device and every invite you issue from it.
The free plan covers three devices with the private network, remote desktop, tunnels, chat and calls all included, so nothing below needs a card.
2 · Mint an enrollment token
In the dashboard, open Devices → Enroll device.
A token is a credential
An enrollment token is single-use and short-lived, and anyone holding it can join a machine to your organization. Paste it into a terminal, not into a chat room, and mint a fresh one if it goes astray.
3 · Install the agent
Pick your operating system. The graphical installer and the one-line form do the same thing — the wizard just asks the questions instead of taking flags.
Recommended — one-line install (PowerShell)
& ([scriptblock]::Create((irm https://roomler.ai/api/setup/install.ps1))) -Role daemon-system -Token <token> -Server https://roomler.aiGraphical installer (Roomler Setup)
Already installed? Enroll manually
roomlerd enroll --server https://roomler.ai --token <token> --name "$env:COMPUTERNAME" --machine-globalMachine-wide install — run the commands below from an Administrator PowerShell (Terminal (Admin)).
Recommended — one-line install
curl -fsSL https://roomler.ai/api/setup/install.sh | sh -s -- --role daemon --token <token> --server https://roomler.ai --name "$(hostname)"Graphical installer (Roomler Setup)
Already installed? Enroll manually
/Library/Roomler/roomlerd.app/Contents/MacOS/roomlerd enroll --server https://roomler.ai --token <token> --name "$(hostname)"Installs the per-user half (screen sharing + input). To also join the overlay mesh, mint a second enrollment token and append --daemon-token <token> — that adds a root LaunchDaemon and a second device row for this Mac.
Recommended — one-line install
curl -fsSL https://roomler.ai/api/setup/install.sh | sh -s -- --role daemon --system --token <token> --server https://roomler.ai --name "$(hostname)"Graphical installer (Roomler Setup)
Already installed? Enroll manually
sudo roomlerd --config /etc/roomler/config.toml enroll --server https://roomler.ai --token <token> --name "$(hostname)"Installs a root systemd system service (sudo will prompt). Screen capture needs a logged-in session — pick 'This user only' for desktops.
Each platform has a fuller page — service modes, permissions, uninstall — at Windows, macOS and Linux.
4 · Watch it come online
Back in Devices, the machine appears within a few seconds.
| Status | What it means |
|---|---|
| Online | The server holds a live socket to the agent. Everything works. |
| Stale | The device is heartbeating, but no server holds its live socket. It self-heals, usually inside about two minutes. |
| Offline | No heartbeat. The machine is off, asleep, or has no route to the server. |
If it does not appear at all, the token was probably consumed by an earlier attempt — mint a fresh one. Troubleshooting has the longer list.
5 · Open the screen
Click the device, then View screen.
What happens next depends on how the device is configured. By default a machine asks the person sitting at it before handing over the screen, so an attended machine shows a consent prompt. Your own unattended machines can be set to skip that — see unattended access.
It should feel direct
On a healthy path the session is peer-to-peer and latency is single- to low-double-digit milliseconds. If it feels sluggish, the pair has almost certainly fallen back to a relay — Cannot connect explains how to tell, in one command.
6 · Join it to the private network
Remote desktop works on its own, but the same agent can also put the machine on your private mesh, giving it a stable address and a name that other enrolled machines can reach directly — no port forwarding, no public exposure.
Once two machines are on the mesh:
roomler status          # this machine: address, name, carrier
roomler peers           # everything else on the mesh, and how it is reached
Then reach one from the other by name or address — a database, an internal web app, SSH — as if they were on the same LAN. Private network covers addresses, names, routing and access control.
Where to go next
Your first remote session
— Multi-monitor, quality, clipboard and file transfer.
Private network
— Addresses, MagicDNS, subnet routers and exit nodes.
Security & access control
— Who may reach what, and how to prove it afterwards.
Self-hosting
— Run the server yourself.