
Connect to a Raspberry Pi remotely: desktop, SSH and any port
- raspberry-pi
- remote-desktop
- ssh
- tunnels
- private-network
- headless
- linux
- tailscale-alternative
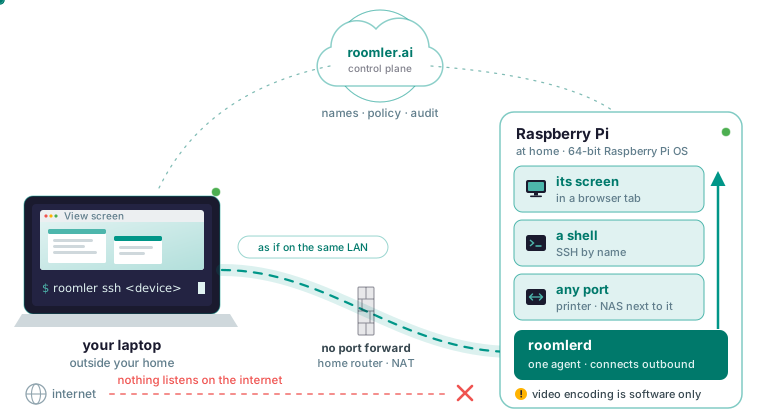
You can reach a Raspberry Pi’s screen, shell and every service on it from outside your home without forwarding a port on the router. One agent on the Pi connects outbound, your browser or laptop connects outbound too, and nothing listens on the internet. The Pi gets a private address that does not change and a name to use instead of it, so you open its desktop in a browser tab, SSH to it by name, or forward any port it can reach. The cost on a Pi is specific: the agent needs the 64-bit Raspberry Pi OS, and the Pi’s CPU encodes the video in software.
What the usual routes give you, and where they stop
On the home LAN you already have SSH for a shell, and VNC or XRDP for a desktop if the Pi has one, and both are fine there. From outside, the guides send you to the router to map an external port to the Pi’s port 22. That costs nothing and works with any SSH client, and it also puts sshd on the public internet for anyone to probe. Behind carrier-grade NAT it does nothing, because the router has no public address of its own for the forward to land on. Raspberry Pi Connect is the official route, it comes preinstalled on current Raspberry Pi OS desktop images, and there is no organization to create and no token to mint. Its screen sharing needs a Wayland desktop, though, so a Pi OS Lite box gets the shell only, through the Lite variant.
None of these reach the Pi’s other services, or the printer and NAS next to it, unless you forward a port per service or pay a tunnel vendor per port. Roomler’s route is one agent on the Pi that connects outbound, and it needs nothing inbound on the router. A pair of machines takes a direct path where one exists, and where every UDP path is blocked the mesh still runs over TLS on port 443. The Pi keeps the same private address wherever it is and answers to a name.
What you need: 64-bit Raspberry Pi OS and one token
The install script puts the.deb on Debian and Ubuntu derivatives for x86_64 and arm64, and the agent runs on those two processor families only, so the Pi needs the 64-bit Raspberry Pi OS. If you are not sure which image is on the card, uname -m on the Pi prints aarch64 on a 64-bit system; anything else is the 32-bit image, which the agent does not run on.
Mint an enrollment token in the dashboard under Devices, then Enroll device. It is single-use, valid for about ten minutes and scoped to the organization that minted it, so paste it into a terminal and never into a chat. The free plan covers 10 users and 100 devices with commercial use included. The viewing side needs a browser and nothing else; Chrome, Edge or another Chromium browser on a laptop or desktop is the recommendation.
Install the agent on the Pi as a system service
The Linux agent has two service modes. A system install, selected with --system, runs as root from boot; the per-user default runs as you and exists for desktops where you want to share the session you are logged into. Pick the system install for a Pi, headless or not, because it is the only mode that puts the machine on the private network with its own adapter. One daemon per machine is the rule, so do not add the per-user unit on top; it suits only a desktop Pi where sharing your logged-in session matters more than the mesh adapter.
Run the headless line from the Linux install page on the Pi, with your token in place of the placeholder:
curl -fsSL https://roomler.ai/api/setup/install.sh | sh -s -- \
  --role daemon --system --token <token> --server https://roomler.ai --name "$(hostname)"
The script installs the arm64.deb, verifies the SHA-256, enrolls the machine and enables the unit. Then check it came up:
sudo roomler statusThe Pi appears under Devices within a few seconds as Online, Stale or Offline; Stale means it is heartbeating without a live socket and self-heals in about two minutes. If it never appears, an earlier attempt consumed the single-use token, so mint a fresh one and run the line again; a re-run on an enrolled machine reuses its device row.
The system config is /etc/roomler/config.toml, written 0600, and it holds the agent token and, once you enable SSH, the SSH host private key. Logs are in journalctl -u roomlerd. systemctl is-active can read inactive on a healthy daemon that systemd does not own, so check pgrep -x roomlerd and roomler peers before you restart anything on that basis.
See the Pi’s screen in a browser tab
Click the device, then View screen. The viewer is the browser itself, with nothing installed on it. What you see next depends on which of three Pis you have.
- A headless Pi on Pi OS Lite has no session to capture, so enable the agent’s virtual-display mode in the device’s configuration, where it survives a reboot; an environment variable does not. View screen then drops you into a live console, and input works in it.
- A Pi with a display attached and the system install needs screen capture and input switched on in the device’s configuration, with the keys
drm_captureanduinput; the agent then reads whatever the screen shows, the login screen included, which the unattended access page calls the Linux counterpart of the Windows system mode. - A Pi with a desktop you are logged into, on the per-user unit, gets direct capture and direct input on X11. Raspberry Pi OS Bookworm’s default desktop runs on Wayfire, or labwc on newer images, both built on wlroots, which the Linux table on the permissions page lists as capture through the desktop portal, less tested, with input not available. Switching the session to X11 in raspi-config is a Raspberry Pi OS setting.
The device’s configuration is read and written with the CLI, which writes atomically and keeps a previous copy:
roomler config ls
roomler config set <key> <value>
A device with no consent setting asks the person sitting at it, and Automatic is the only value that skips the prompt. A headless Pi has nobody to ask, so the request ends as a timeout or as no prompt surface, and the controller is told which. Set that device’s consent mode to Automatic, per device, and read the audit log now and then: every session and every refusal is recorded with who, when and from where. You set all of these on the Pi itself, over the SSH you already have or at install time, because the server cannot write a machine’s own configuration unless that machine opted in to remote configuration.
If View screen connects and shows black on a headless Pi, there is no session to capture and no virtual display yet; roomler status on the Pi reports its capture state, so you can tell no display from no permission, and the black screen page has the Linux steps.
SSH to the Pi by name
If the Pi already runs sshd, as most do once SSH is switched on in Raspberry Pi Imager, the first route needs nothing new on it. Once your laptop is enrolled too and both machines are on the mesh, you reach the Pi by its mesh name or address as if you were on the same LAN, with no router change. The name is the one you gave at enrollment, and a rename in the dashboard propagates across the mesh without touching the Pi. On a Linux laptop, names resolve through systemd-resolved, and roomler status says so when nothing asks it; use the address roomler peers prints in that case.
roomler status
roomler peers
The second route is Roomler SSH, which serves SSH on the Pi with no sshd, no bound port and no firewall rule. It is off by default behind four gates: the organization’s SSH switch, your own SSH permission, which is not in the default administrator role, the device’s SSH policy, and the Pi’s own configuration. On the Pi that means ssh_enabled on, your public key in ssh_authorized_keys, where an empty list means nobody, and an ssh_account_mode: named runs the session as the Pi’s own local account, daemon means root, and console_user needs someone signed in at the Pi’s screen. Leave ssh_port at its default of 2222 so the sshd on 22 keeps serving. SSH settings apply on restart, and the agent will not restart itself.
Connect with roomler ssh, which resolves the device name through the server and verifies the host key for you:
roomler ssh <device>
roomler ping <device>
roomler exec <device> -- <command>
You get interactive shells, one-off commands, scp and sftp, and -L, -J and -D forwards; -R is deliberately not implemented, because it would make the Pi bind a listening socket. The SSH forward allow-list is default-deny, so an empty list means nowhere, and session contents are never recorded. roomler ping checks reachability over the mesh by device name. roomler exec is for the day the mesh itself is broken: it runs over the agent’s control connection, and under systemd the command runs as root, so grant it to the people you would give root to.
Reach any port on the Pi, and anything behind it
When your laptop is on the mesh
Open the Pi’s service by name and port in the browser, the way the docs show http://build-server:8080, with the Pi’s name and the port its web UI listens on. Nothing is exposed to the internet, and the service keeps listening only where it always did.
A forward from a laptop with only the tunnel client
A laptop without the full agent can install the tunnel client: the roomler CLI alone, one binary, with no service, no screen capture and no mesh membership. Its token comes from Tunnel clients, then Enroll, a different token type from the device one.
curl -fsSL https://roomler.ai/api/setup/install.sh | sh -s -- \
  --role tunnel --token <token> --server https://roomler.ai --name "My laptop"
Then open a forward. --local is a loopback port on the laptop and --remote is the host and port the Pi dials; 5432 is the docs’ database example, so put your service’s port in its place.
roomler forward --agent <agent-id> --local 5432 --remote localhost:5432--agent takes the hex device id from the Pi’s page in the dashboard; a name is not resolved there and fails in a way that looks like a missing device. Point --remote at a LAN address instead of localhost, say 192.168.1.10 and the printer’s port, and the Pi becomes a jump host to the printer, NAS or controller on its network. UDP is forwarded as well as TCP, and every forward is checked against the organization’s tunnel policy and recorded. On a laptop that runs the agent, --daemon hands the flow to that agent so it outlives the command, with roomler flows and roomler kill to manage it, and a declared route is reconciled on every start, so it comes back after a reboot.
roomler route add --agent <agent-id> --local 5432 --remote localhost:5432
roomler route ls
The whole home LAN
For many hosts at once, run a SOCKS5 proxy that exits through the Pi and set it as the SOCKS proxy in a browser profile.
roomler socks5 --agent <agent-id> --local 1080Or make the Pi a subnet router: it advertises the range it sits on, an administrator approves that range in the dashboard, and every device on the mesh can then reach addresses in it through the Pi, and the docs say a small always-on box is ideal for the job. Do not advertise a range that overlaps the laptop’s own LAN; the docs’ example is a laptop on 192.168.1.0/24 that suddenly routes 192.168.1.0/24 over the mesh and loses its own router, so pick the narrowest range you need, from one machine. Approval makes the range reachable, and the organization’s access rules still decide who may reach what through it.
What a Pi cannot do yet, according to the docs
Video encoding on a Pi is software only. On Linux the agent uses NVIDIA, Intel or AMD hardware encoders where the driver provides them, with software as the floor, and on Linux ARM hardware encoding exists only with an NVIDIA GPU and driver 530.41 or newer, from agent 0.4.188. A Pi has none of those, so its CPU encodes every frame, and a machine pinned at 100% CPU encodes slowly whichever encoder it picked. A 4K desktop is four times the pixels of 1080p, which on a software encoder is the whole budget, so lower the Pi’s display resolution and set the session priority to Responsiveness. Read the LAN / Direct / Relay indicator first, though: a session on Relay is slow because of the path, and the usual cause is a VPN client on the laptop capturing the local range.
The agent runs on x86_64 and arm64 Linux and nothing else, so the 32-bit Raspberry Pi OS image, and any model that cannot boot the 64-bit one, is out.
On the per-user unit, the wlroots compositors Raspberry Pi OS ships are captured through the desktop portal, less tested, with no input.
The server image is published for linux/amd64 and linux/arm64, and the arm64 image is built and smoke-tested on a native arm64 machine, but the whole stack has not yet been run on an arm64 host. It also wants about 4 GB RAM and 10 GB disk. Treat a Pi-hosted server as untested, and if you want to self-host, follow the self-hosting page on an x86_64 box.
Two smaller limits: ssh -R remote forwarding is not implemented, by design, and on the Free plan an organization runs one remote session at a time, so a second viewer is refused with a message that says who is connected and to which machine.
Where to go next
The checklist on the verify your install page starts with four lines: roomler status reports connected, the device shows Online, roomler peers from another machine lists it, and View screen shows a real picture. The SSH, tunnels and self-hosting pages cover the full surface of each. Put two of your machines on one private mesh in a few minutes with the quickstart.