
How to securely access a home server with no open ports
- home-server
- self-hosting
- remote-access
- security
- mesh
- port-forwarding
- tailscale-alternative
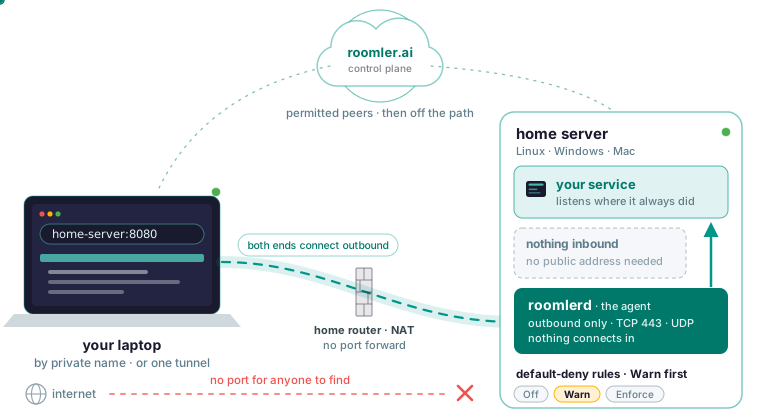
The secure way to reach a home server from outside is to have nothing on it listening on the internet. An agent on the server connects outbound and nothing connects in, so there is no port for anyone to find. You reach the service by its private name, or through one port forwarded on the laptop. Default-deny rules decide which of your devices may reach it at all. No step forwards a port on the router. The walkthrough uses a Linux server, with the Windows and Mac differences noted in place.
What each remote access option leaves exposed
Router port forwarding plus dynamic DNS puts the service itself on the public internet. Every scanner finds the port, which is where the login attempts in your logs come from, and the service’s own login form is all that stands between them and your files.
A VPN on the router narrows that to one listening port on the router, speaking one protocol. It needs no third party and no agent on each device. Once a client is inside it can reach the whole LAN, which is convenient at home and the wrong default for a laptop that might get stolen.
A hosted tunnel connector in the Cloudflare style listens on nothing: the connector dials out, and the provider’s edge accepts your visitors. You get a public URL anyone can open, which Roomler cannot give you, because it has no public ingress. In exchange you publish a hostname, and the provider’s edge sits in the path of the web traffic it proxies.
A mesh agent, which is what Roomler installs, has both ends connect outbound and meet in the middle, so neither the server nor the router opens an inbound port, SSH included. The coordination server hands each machine its list of permitted peers and helps two of them find each other; when no direct path exists, the traffic goes through a relay that forwards ciphertext it cannot read. Tailscale does this job with mobile apps, years of production use and an enormous fleet behind it, and Roomler’s own comparison page says that if a private network between your machines is all you want, you should use Tailscale. The reasons to pick Roomler instead are a browser remote desktop and SSH on the same agent, and a control plane you can self-host on the same code.
Put the agent on the home server
Mint an enrollment token in the dashboard under Devices, then Enroll device. It is single-use, it expires after about ten minutes, and anyone holding a live one can join a machine to your organization, so paste it into a terminal and nowhere else, and mint a fresh one if it goes astray.
On a Linux server, install as a root systemd service with --system, because only a system install puts the machine on the private network with its own adapter, from boot:
curl -fsSL https://roomler.ai/api/setup/install.sh | sh -s -- \
  --role daemon --system --token <token> --server https://roomler.ai --name "$(hostname)"
Then check it came up, and do not judge it by systemd alone: a healthy daemon that systemd does not own reads as inactive, so look for the process and run roomler peers before restarting anything:
sudo roomler status # system install
pgrep -x roomlerd && echo running
The ports and firewall page is short: outbound TCP 443 to the server, outbound UDP to peers and relays, and nothing inbound, so no port forward and no inbound firewall rule. If your ISP gives you no public address, that changes nothing, because nothing on the server needs to be reachable. With only 443 open everything still works over the TLS floor, but every path is relayed, and if you can change one thing on a strict network, allow outbound UDP. Check from the server itself, because netcheck reports what the machine can reach as measured:
curl -sI https://roomler.ai/health     # or your own server
roomler netcheck                       # what this machine can actually reach
A Windows server needs the machine-wide system service mode to be reachable at the lock screen or before anyone signs in. A Mac mini needs the root half of the install to join the mesh, and it must stay logged in, locked or not, to be viewed as a desktop. A Linux box with no monitor can still be opened as a desktop through the agent’s virtual-display mode, switched on in the device’s configuration. The agent’s token lives in /etc/roomler/config.toml, written 0600, so treat that file as a secret.
Reach the service by its private name
Names need the agent on both ends, because the tunnel-only client does not join the mesh. On a Linux laptop, mint a second token and run the per-user line:
curl -fsSL https://roomler.ai/api/setup/install.sh | sh -s -- \
  --role daemon --token <token> --server https://roomler.ai --name "$(hostname)"
A Windows or Mac laptop has its own install page; on Windows the graphical installer and the one-line form do the same thing. Then, on either machine:
roomler status          # this machine: address, name, carrier
roomler peers           # everything else on the mesh, and how it is reached
The first shows the machine’s own mesh address; the second lists the other machine and the path carrying it, LAN, Direct or Relay. If both machines are at home and it still says Relay, the usual cause is a VPN client on one of them capturing the range the mesh uses; disconnect it and watch the pair converge to direct, and the cannot connect page walks the other causes in order. Symmetric NAT on both ends or UDP blocked outbound also force a relay, and then the relay is the right answer, while the mesh keeps retrying a direct path.
Every device gets a private address that stays the same when the machine moves between networks, plus a name taken from the name you gave at enrollment. From the laptop, the server’s web interface is http://home-server:8080, with your service’s port in place of 8080, and the address behind that name is not routable from the internet, so only your own enrolled machines can reach it. Renaming a device in the dashboard updates the name across the mesh without touching the machine. The address is a lease: remove the device and re-enroll it and it comes back with a fresh one, so point bookmarks and scripts at the name. To check reachability by device name, display name or overlay address:
roomler ping <device>Or forward one local port to one service
If the laptop should not itself be reachable from anywhere, install only the tunnel client: one binary, no service, no screen capture and no mesh membership. Its token comes from Tunnel clients, then Enroll, a different token type from the device token:
curl -fsSL https://roomler.ai/api/setup/install.sh | sh -s -- \
  --role tunnel --token <token> --server https://roomler.ai --name "My laptop"
A tunnel is a port on the laptop, bound to loopback, carried through the mesh to the agent on the server, which dials the service locally, so the service keeps listening only where it always did and nothing faces the internet. The docs’ example forwards a database:
roomler forward --agent <agent-id> --local 5432 --remote localhost:5432The two port numbers are the only things you change for your own service. --agent takes the hex device id, copied from the device’s page in the dashboard; a display name fails in a way that looks like the device is missing. Without --daemon the command stays in the foreground and Ctrl-C tears the forward down; with it, the local agent keeps the flow, and you manage it with:
roomler flows          # every flow the local daemon is running
roomler kill <flow-id> # stop one
For a forward you always want, declare a route; the agent re-establishes declared routes on every start and backs off when one cannot be established, so it never hammers the server:
roomler route add --agent <agent-id> --local 5432 --remote localhost:5432
roomler route ls
roomler route disable <id>
roomler route rm <id>
--remote can name any host the server can reach, which makes the server a jump host to the NAS or an appliance on the LAN; the docs’ example reaches a database at db.internal:5432. UDP forwards work as well as TCP. Every forward is checked against the organization’s tunnel policy before it is established, and every decision is recorded. For many destinations at once, run the SOCKS5 proxy instead; for a shell, use SSH, which comes below.
Reach the rest of the home network through the server
For the NAS, the printer, the hypervisor or the smart-home hub that will never run an agent, make the always-on server a subnet router. The docs give four steps: pick a machine that is already on that LAN and normally on, configure it to advertise the range, approve the range in the dashboard as an administrator, and every other device on the mesh can then reach addresses in it through that machine. Advertising and approving are separate on purpose, because “send me everything for this range” is a large claim and it takes two parties.
Overlap is how this usually breaks. If the laptop sits on a friend’s network that also uses 192.168.1.0/24 and the mesh now routes 192.168.1.0/24 to your house, the laptop has lost its own router. Advertise the narrowest range that covers what you need, pick unambiguous ranges, and advertise a range from one machine only.
Approving a route makes the addresses reachable; which device may use them is still decided by the organization’s access rules, covered next. An exit node is the bigger tool, routing all of a device’s internet traffic through a machine you own so that it leaves with your own IP, and it fails harder, because the device loses its internet when the server does. Check from the laptop:
roomler status     # confirm you have the route
ping <an-address-in-the-range>
If the route is present and nothing flows, the next suspect is the server’s own firewall, then the access rules.
Decide which devices may reach the server, and test it in Warn mode first
Being on the mesh should not mean reaching everything on it. A network access rule names a source, which is a device, a tag, a user or a group; a destination, which is a device, a tag or an address range; and the ports and protocols, written like tcp:22, tcp:443 or udp:53, or all. Tags are the useful unit: tag the laptop and the server, and write rules between the tags.
Off applies nothing, Warn evaluates and logs every decision without blocking, and Enforce applies them. Go through Warn first, every time: each packet that would have been denied is recorded without being dropped, so you see which rule is wrong before it costs you access to your own server. Network ACLs are feature-complete but have not yet been widely exercised in enforcing mode, so Warn is the recommended path and the log is there to be read.
Rules are enforced at both ends: a peer you may not reach is left out of your peer list, and the receiving machine refuses traffic it was never entitled to, including traffic from a peer claiming an address it does not own. An unreadable policy is a denial. No policy compiled falls back to the organization-wide scope, while a policy that permits nothing denies everything, and the two are kept distinct. Relay paths are gated by the same rules, so a longer path is no way around them. Every decision is recorded.
For a home, the docs’ worked example shrinks to this: tag the laptop and the server, allow laptop to server on the service port and on the agent’s SSH port, allow nothing else, run in Warn for a week, read the log, then switch to Enforce. If the server then disappears from your peer list or a tunnel is refused, go back to Warn and read the log before trying again; a permission refusal is reported as a refusal, so read the message.
Keep the dangerous switches on the server itself
The most powerful actions on the server, running a command, opening a shell and relaying other machines’ traffic, are off by default behind four independent gates: an organization switch per capability, a per-person permission that is deliberately missing from the default administrator role, a device policy set by an administrator, and the machine’s own config.toml. The first three are enforced by the server and would fall together if the control plane were compromised; the fourth lives in a file the server structurally cannot write, and the cost is that turning those actions on means touching the machine. A machine can opt in to being configured from the dashboard, and that opt-in, remote_config_enabled, is off by default and can only be set on the machine.
For SSH to the home server, the machine-side settings are all default-deny: ssh_enabled is off; an empty ssh_authorized_keys means nobody, so enabling SSH without listing a key grants nothing; an unset ssh_account_mode means authenticate, then run nothing; ssh_port defaults to 2222 so an existing sshd keeps serving; and an empty forward_acl means nowhere. Set them on the machine with the config commands:
roomler config ls
roomler config set <key> <value>
roomler config clear <key>
SSH settings apply on restart, and the agent will not restart itself, so restart it or wait for the next reboot. The organization’s SSH switch, your own SSH permission and the device policy must also allow it, and a session that authenticates and then does nothing is the empty key list or the unset account mode.
Once it is on, the server still runs no sshd, binds no port and needs no firewall rule: packets to its mesh address on the SSH port are diverted into the agent below the socket layer, so there is nothing listening for the internet to find. Shells, commands, scp and sftp, and -L, -J and -D forwards all work; -R remote forwarding is deliberately not implemented, because it would make the machine bind a listening socket. A -L forward, or a -J hop through the server to the NAS, is refused until the destination is named in the server’s own forward_acl.
roomler ssh <device>Remote command execution runs as root under systemd and as SYSTEM on Windows, so grant it to people you would give root to, and switch it off after the debugging session you switched it on for. For your own server, set the consent mode to Automatic, per device. Read the audit log occasionally, and the device list, which shows which capabilities each machine has switched on. Session contents are never recorded: the server keeps the decision record, who asked for what and whether it was granted, and the machine’s own activity log is off by default, so an empty activity log is not evidence of inactivity.
What the server can see, and what it cannot
The server holds accounts, organizations and memberships, device rows with names, addresses and versions, permissions and policies, audit records of who asked for what and the outcome, chat messages, rooms and uploaded files, and presence and connection metadata. It does not hold session video, keystrokes, tunnel contents, SSH bytes or mesh traffic. Its job ends once two machines can find each other, after which it is off the path, and a relay forwards ciphertext it cannot decrypt. The device-held gates from the previous section are why this holds even if the control plane were compromised. The one exception is video calls, which use a selective forwarding unit, so call media passes through the server.
If you self-host, “what the server sees” becomes “what your own machine sees”, and nothing is held back from a self-hosted deployment. The server is AGPL-3.0 and the agent is MPL-2.0, so every claim above is checkable in the source.
See what the server can and cannot see: What the server sees.